How to Set Up a New Template in ROGER
How to Set Up a New Template in ROGER
How to Create & Customize a Contract Template in ROGER
Setting up a new template in ROGER helps you speed up your contract process, keep things consistent, and deliver a smooth signing experience to your customers. Follow these steps to create and customize your own template.
Step 1: Open or create a new template
When you first open a template, you’ll see a basic layout that includes placeholder sections. If you're starting fresh, click Add Template to begin.
Step 2: Add your logo and agreement name
At the top of the template, you can upload your company logo and enter the agreement name. This could be a Sales Agreement, Order Form, MSA, whatever suits your contract type.
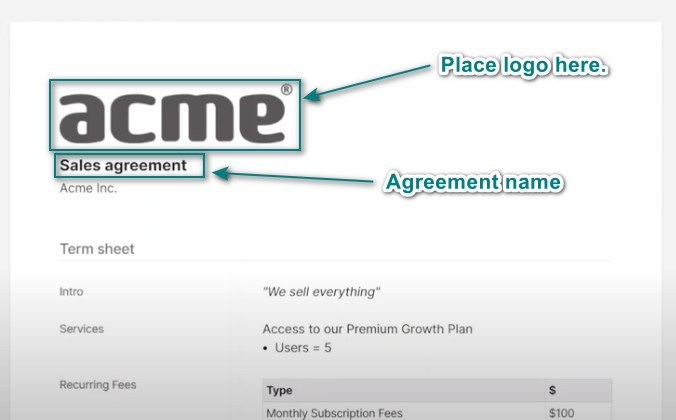
Step 3: Include your company name and intro
Below the agreement name, add your company name and a brief description to provide context. This is the first thing your customer will see, so keep it clear and informative.
Step 4: Set up the term sheet
This section outlines the key deal terms you’ve discussed with your customer, things like:
Scope of service or deliverables
Customizations or special notes
Pricing or fee structure
Contract length and renewal terms
This part acts like a summary of your conversation and agreement.

Step 5: Organize your template
You can rearrange the order of fields by simply dragging and dropping them in the list.
Step 6: Build your form
This is where you collect the information you need from the customer, such as:
Company legal name
Contact person
Job title
Banking or billing details
Use a Q&A format to make it more conversational and easier for the customer to fill out. For example, instead of just “Job Title,” ask: What’s your role at the company?

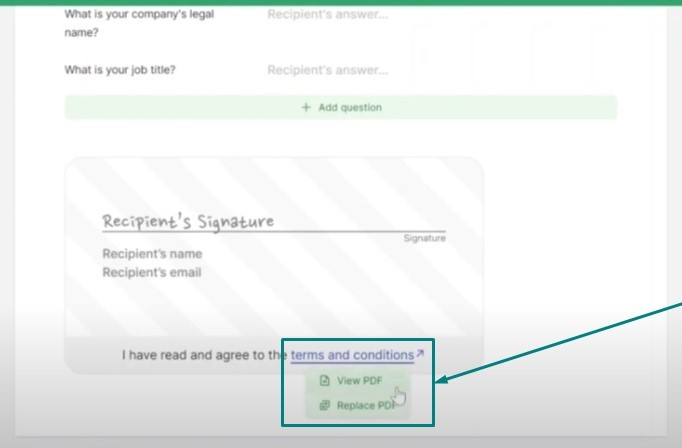
Step 7: Add your terms and conditions
At the bottom of the template, insert your boilerplate terms and conditions. Think of this like the fine print you’d see when downloading an app or making a purchase online.
These terms are important for legal reasons but separate from the term sheet above. You can upload or edit the PDF directly in this section.
Step 8: Save and preview your template
Once you’re done, save your template and preview it to make sure everything looks right from your customer’s perspective.
✅ You’re all set!
Your template is now ready to use and share. If you have any questions or need help improving your setup, feel free to reach out through the ROGER dashboard or email us at team@thanksroger.com.
Real-World Insight from Operations
Emily Demirdonder, Director of Operations and Marketing at Proximity Plumbing, shares how tailored contract templates improved efficiency in their team:
“Trying to force a one-size-fits-all template caused confusion and back-and-forth, which slowed everything. Once we built in conditional clauses, fillable fields for specifics like pay scale ranges, and separate editable sections for each department, we cut contract processing time by nearly 40 percent.”
👉 Prefer to dive in at your own pace? Start a free workspace in seconds and send your first contract on us.
👉You can also book a quick 15-minute call and get a live walkthrough from our team.
👉Curious about what’s under the hood? Browse our feature list to discover smart fields, approval workflows, and everything else that makes contract management effortless.
How to Create & Customise a Contract Template in ROGER:
A Step-by-Step Tutorial
Setting up a new template in ROGER helps you speed up your contract process, keep things consistent, and deliver a smooth signing experience to your customers. Follow these steps to create and customize your own template.
Step 1: Open or create a new template
When you first open a template, you’ll see a basic layout that includes placeholder sections. If you're starting fresh, click Add Template to begin.
Step 2: Add your logo and agreement name
At the top of the template, you can upload your company logo and enter the agreement name. This could be a Sales Agreement, Order Form, MSA, whatever suits your contract type.
Step 3: Include your company name and intro
Below the agreement name, add your company name and a brief description to provide context. This is the first thing your customer will see, so keep it clear and informative.
Step 4: Set up the term sheet
This section outlines the key deal terms you’ve discussed with your customer, things like:
Scope of service or deliverables
Customizations or special notes
Pricing or fee structure
Contract length and renewal terms
This part acts like a summary of your conversation and agreement.
Step 5: Organize your templates
You can rearrange the order of templates by simply dragging and dropping them in the list.
Step 6: Build your form
This is where you collect the information you need from the customer, such as:
Company legal name
Contact person
Job title
Banking or billing details
Use a Q&A format to make it more conversational and easier for the customer to fill out. For example, instead of just “Job Title,” ask: What’s your role at the company?
Step 7: Add your terms and conditions
At the bottom of the template, insert your boilerplate terms and conditions. Think of this like the fine print you’d see when downloading an app or making a purchase online.
These terms are important for legal reasons but separate from the term sheet above. You can upload or edit the PDF directly in this section.
Step 8: Save and preview your template
Once you’re done, save your template and preview it to make sure everything looks right from your customer’s perspective.
✅ You’re all set!
Your template is now ready to use and share. If you have any questions or need help improving your setup, feel free to reach out through the ROGER dashboard or email us at team@thanksroger.com.
👉 Prefer to dive in at your own pace? Start a free workspace in seconds and send your first contract on us.
👉You can also book a quick 15-minute call and get a live walkthrough from our team.
👉Curious about what’s under the hood? Browse our feature list to discover smart fields, approval workflows, and everything else that makes contract management effortless.